Leverage the Integration Framework in Mautic 5
The Integration Framework in Mautic 5 is a powerful feature that enables developers to seamlessly configure and manage plugin settings in Mautic. Whether you're just starting with a simple plugin or building a more complex integration, the framework provides tools to streamline the process.
Why Use the Integration Framework?
A plugin in Mautic can function perfectly fine without any integrations. However, at some point, you may want to expand the capabilities of your plugin. The Integration Framework offers several benefits, such as:
- Simplified Plugin Settings: Leverage the plugin_settings database table to store and retrieve plugin settings.
- Secure Data Handling: Encrypt and decrypt sensitive settings, such as API keys.
- User-Friendly Interfaces: Build configuration forms by utilizing predefined Mautic core interfaces, such as built-in configuration traits and default form rendering utilities.
- Data Mapping: Data mapping for integration with external systems (but this is not the topic for this post)
While the framework has evolved over time, it can seem a bit daunting if you're diving deep into its details, at least this was the case for me when I first started with Mautic. This guide will show you how to quickly set up a plugin that uses the Integration Framework to store plugin settings in the database.
Getting Started
A complete working example of a plugin using the Integration Framework can be found on GitHub.
Step 1: Set Up Your Development Environment
First, install Mautic using DDEV by following this guide.
Next, clone a boilerplate plugin that does not use the Integration Framework:
git clone -b dev https://github.com/mzagmajster/mautic-plugin-boilerplate.git
Install the plugin by following the instructions in its README file. Once installed, you should see a basic plugin modal in Mautic without any integration settings.
Step 2: Add an Integration Class
Create a new class in the Integration folder of your plugin. Below is an example of an integration class:
<?php

namespace MauticPlugin\HelloWorldBundle\Integration;

use Mautic\IntegrationsBundle\Integration\BasicIntegration;
use Mautic\IntegrationsBundle\Integration\ConfigurationTrait;
use Mautic\IntegrationsBundle\Integration\DefaultConfigFormTrait;
use Mautic\IntegrationsBundle\Integration\Interfaces\BasicInterface;
use Mautic\IntegrationsBundle\Integration\Interfaces\BuilderInterface;
use Mautic\IntegrationsBundle\Integration\Interfaces\ConfigFormFeaturesInterface;
use Mautic\IntegrationsBundle\Integration\Interfaces\ConfigFormInterface;
use Mautic\IntegrationsBundle\Integration\Interfaces\IntegrationInterface;
use Mautic\PluginBundle\Entity\IntegrationRepository;

class MzExampleIntegration extends BasicIntegration implements BasicInterface, ConfigFormInterface, IntegrationInterface, ConfigFormFeaturesInterface, BuilderInterface
{
    use ConfigurationTrait;
    use DefaultConfigFormTrait;

    public const NAME = 'mzexample';
    public const DISPLAY_NAME = 'MZ Example Integration';

    public function __construct(
        private IntegrationRepository $integrationRepo
    ) {
        $this->integration = $this->integrationRepo->findOneByName('MzExample');
    }

    public function getName(): string
    {
        return self::NAME;
    }

    public function getDisplayName(): string
    {
        return self::DISPLAY_NAME;
    }

    public function getIcon(): string
    {
        return 'plugins/HelloWorldBundle/Assets/img/icon.png';
    }

    public function getSupportedFeatures(): array
    {
        return ['mzTestFeature' => 'My test feature'];
    }

    public function isSupported(string $featureName): bool
    {
        if (!$this->hasIntegrationConfiguration()) {
            return false;
        }

        return in_array(
            $featureName,
            $this->getIntegrationConfiguration()->getSupportedFeatures()
        );
    }
}
Step 3: Register the Integration
Add the integration to the Config/services.php
Important: Value for MzExampleIntegration::NAME needs to be class name in lowercase without integration suffix. The service ID must follow the convention mautic.integration.{MzExampleIntegration::NAME} for the integration to be registered. properly.
<?php
// somewhere in service.php
$services->set('mautic.integration.mzexample')
>class(
  MauticPlugin\HelloWorldBundle\Integration\MzExampleIntegration::class
);
Step 4: Clear Cache and Reload Plugins
Run the following commands to clear the cache and reload plugins:
cd /var/www/html
rm -rf var/cache/dev/* var/cache/prod/*
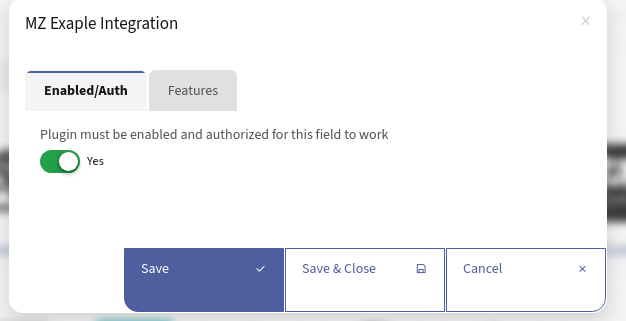
php bin/console mautic:plugins:reloadNavigate to the Plugins section in Mautic, and you should see your new integration. Open the modal to configure your integration settings.
GUI
If we check the GUI now, we should see something like this:

Using Integration Framework Settings
Settings configured in the plugin modal are stored in the plugin_integration_settings table. Here's a description of the table:
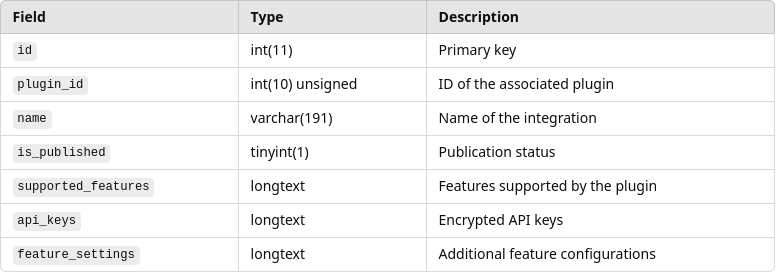
Additional feature configurations
For example, data from the Auth tab in the configuration form will be encrypted and stored in the api_keys field.
Using the Settings
Those settings can then be used through out the plugin. One common example is to check if integration is published and based on that execute or skip some logic. Take a look at the example below:
<?php

namespace MauticPlugin\HelloWorldBundle\EventListener;

use Mautic\CoreBundle\CoreEvents;
use Mautic\CoreBundle\Event\CustomTemplateEvent;
use MauticPlugin\HelloWorldBundle\Integration\MzExampleIntegration;
use Symfony\Component\EventDispatcher\EventSubscriberInterface;

class ReplaceTemplateSubscriber implements EventSubscriberInterface
{
    public function __construct(
        private MzExampleIntegration $exampleInt
    ) {
    }

    public static function getSubscribedEvents(): array
    {
        return [
            CoreEvents::VIEW_INJECT_CUSTOM_TEMPLATE => [
                ['replaceTemplates', 0],
            ],
        ];
    }

    public function replaceTemplates(CustomTemplateEvent $event): void
    {
        $isPublished = $this->exampleInt?->getIntegrationConfiguration()?->getIsPublished();

        if (!$isPublished) {
            return;
        }

        $testFeature = $this->exampleInt?->isSupported('mzTestFeature');

        if (!$testFeature) {
            return;
        }

        // Logic to replace templates here
    }
}
In the example above we check and if integration is not published or feature not enabled on plugin modal form, we exit the function early.
Conclusion
The Integration Framework in Mautic 5 simplifies building robust integrations. This guide covers the basics, but there’s much more to explore.